Saturday, January 8, 2011

Getting Amiga 500 game Demon's Winter running on Ubuntu

This is a step by step instruction on how to get the Amiga 500 game Demon's Winter running on Ubuntu 10.10.

It's highly probable that these instructions will get most Amiga games running on most versions of Ubuntu/Linux. At the very least it'll give you an understanding of the steps to take to get emulating Amiga to work.

Step 0: What is Demon's Winter?
Demon's Winter is a role-playing game released in 1988 for the Amiga by Moby Games. A friend told me about it so I decided to try and get it up and running on my Linux Desktop. If you want to know more check out the following pages
http://en.wikipedia.org/wiki/Demon's_Winter
http://www99.epinions.com/game-review-F1F-5744459-3A290AB3-prod1

Step 1: Download Demon's Winter rom
Amiga roms are called .adf ( Amiga Disk File ) and you need it to play the game naturally.
Download zipped Demon's Winter rom from link belown and unzip it somewhere.
http://www.emuparadise.org/Amiga_ROMs/Demon's_Winter/5958

Step 2: Download Amiga Kickstart Rom 1.3
To start the game you need to emulate the Amiga OS, for this you need a Kickstart Rom. In case of the Amiga 500 you need a 1.3 kickstart rom. You can create your own if you own the original amiga disks but it's probably also legal to download it if you do.
Asuming you do own a copy, download these zipped roms from pirate bay and unzip "Amiga kick13.rom" somewhere.
http://thepiratebay.org/torrent/4021764/Amiga_Kickstart_Rom_1.3__2.0_and_3.1

Step 3: Install Amiga Emulator E-UAE
In the "Ubuntu Software Center" search for "Amiga Emulator" and install "E-UAE".

Step 4: Start Game!
Start E-UAE
Select the "Memory" tab. Change Kickstart ROM file and select "Amiga kick13.rom"
Change to "Floppy disks" tab. For DF0, click "insert" and select "Demon's Winter.adf"
Change to "Game ports" tab. I'm using Mouse for Port 0 and Numeric Pad for Port 1 and that seems to be working fine.
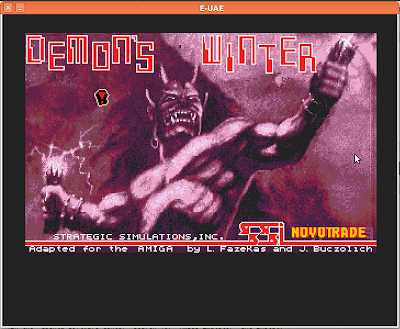
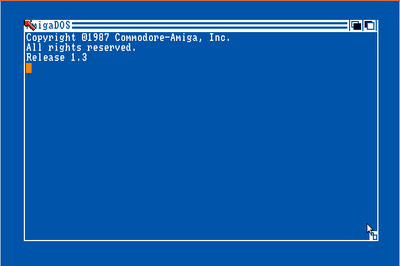
Click start, after a while the Amiga loading screen should should up. Wait for a few seconds and Demon's Winter starts.

Enjoy the game!

Saturday, November 27, 2010

HTML5 Gaming Library Ideas

At Øredev this year and I went to a presentation on Cocos2d for Iphone, "a framework for building 2D games, demos, and other graphical/interactive applications on the Iphone". Since I have been working with HTML5 this gave me an idea that there should be a similar library for HTML5.

This is some of the main features that I think need to be a part of it:

Scene
The Scene object should automaticaly cover the entire canvas/screen.
Holds a list of Nodes
Can hold a list of Layers
An Application can have many Scenes.
- A pause scene
- Main menu scene
- Game scene
It should be possible to have transistions between Scenes

Layers
This is an invisible container for nodes. It can be used to create layered effects such as a background layer and a front layer.

Nodes
Nodes are the objects.
Attributes
-position ( in relation to their parent node, scene or layer )
Should the position be midpoint or left corner. I think both should be possible and can be set depending on what kind of object it is we are working with. E.g. Tile(left corner), Bullet(midpoint)
Methods
-Move To
-Move
-Scale
-Rotate
-RegisterEvent

Sprite
A sprite is a type of node that has an image
Used for images and textures.

Label
A sprite is a type of node that has text
Attributes:
-Text
-Font
-Size
Methods
-Update Text

Prebuilt Nodes Structures
To make it easy for people there should be inbuilt node structures.
E.g.
Menu
-Has menu items

Node Factory
There should be a node factory that creates nodes. Similary to Strophe and Jquery
The factory could be accessed through any other node or scene to create a child node
$scene.cnode(parameters);
$node.cnode(parameters);

Identification
Should use Jquery like identification
I am using the JQuery operator $ in my example but likely it would need to be something else.
$('#apa') - Find object with Id 'apa'
$('node') - All nodes
$('.sprite') - All nodes of class sprite (and it should be possible to create your own classes.

Sequence of Actions
Like JQuery and Strophe objects (nodes,scenes,layers) should return them self if nothing else is returned. This makes it possible to to sequences.
$('#apa').rotate(5).scale(-1).move(150)
$(this).cnode(parameters).move(150).up().scale(160)

Schedule
There should be schedule methods to do time based gaming.

Physics
Could be joined with BOX2DJS for 2d physics

Director
Should be a director that controls the flow of things.

Sound
Background Music
Effects

Particle System
It would be coold to have particle system to create fire and stuff like that.

Tuesday, November 16, 2010

QTP: Connecting to SQL Database

This post describes how you can connect to a SQL Database, execute an SQL statement and loop through the results from QTP using vbscript. The process is pretty straight forward, the main issue is getting the correct connection string for your database.

In the example I am connecting to Access database Northwind. But it should be the same code for connecting to any database, just a different connection string. In my current project we are using this to connect to a IBM DB2 database and it works great.

Option Explicit

Dim connectionString, sql, cn, cmd, rs

' Connection String required to connect to MS Access database
connectionString = "Provider=Microsoft.Jet.OLEDB.4.0;Data Source=C:\Program Files\Microsoft Office\Office10\Samples\Northwind.mdb;"
' SQL statement to run
sql = "select EmployeeID,LastName from employees"

' Create ADO Connection/Command objects
set cn = createobject("ADODB.Connection")
set cmd = createobject("ADODB.Command")

' Open connection
cn.open connectionString
' Associate connection object with command object
cmd.ActiveConnection = cn
' Set the SQL statement of the command object
cmd.CommandText = sql

' Execute query
set rs = cmd.execute

' Enumerate each row in the result set
while rs.EOF <> true and rs.BOF <> True
' Using ordinal
msgbox "Employee ID: " & rs(0)
' Using name
msgbox "Last Name:" & rs("LastName")

rs.movenext
wend

' Close Connection
cn.Close

Tuesday, October 19, 2010

Multiple Binds/Triggers in JQuery

Today I experimented with Multiple binds/triggers in Jquery. What I wanted to do what to raise an event, lets say "Add Contact" and have multiple other elements react on that. Well, it wasn't as smooth as I expected since you have to trigger an event on a specified element and only that element or a parent element can bind to it.

Example:
Take this very simple webpage. The scenario is that I wan't to trigger an event when clicking on "Add Contact" and on that event something should happen with both my contact list and my twitter widget.
...
<body>
 <div id="main">
  <button id="add_contact">Add Contact </button>
  <div id="contact_list">Contact List: </div>
  <div id="twitter_widget">Twitter Widget: </div>
 </div>
</body>
...

So if I want to trigger an event on the button you have to trigger it on some element. If I trigger it on contact_list then only that element can bind to it, and if I trigger it twitter_widget then contact_list can't bind to it. So the solution is to bind it to both elements.

We'll have to image that I have a variable with the contact object
$('#add_contact').click(function() {
 $('#contact_list, #twitter_widget').trigger('add_contact', contact );
})

And then add binds to both your elements.
$('#contact_list').bind('add_contact', function(e, contact) {
 $(this).append('* ' + contact.name + '
');
});

$('#twitter_widget').bind('add_contact', function(e, contact) {
 $(this).append('> Tweeted: I added ' + contact.name + ' to my contact list, I think this is the beginning of a beautiful friendship.
');
});

I want to finish this post with a lengthy example where I use this technique and also the reverse. Where I have two buttons that trigger the same event on another element. Great for logging. And also an example where one button click triggers more than one event. It know it looks messy in a this post so just copy-paste it to your favorite editor, save as .html and open in a browser and you will see the magic.

Enjoy!
<html>
 <head>
  <title>Welcome to Jquery Multiple Bind Example!</title>
  <script src="http://ajax.googleapis.com/ajax/libs/jquery/1.4.3/jquery.js"></script>
 </head>
 <body bgcolor="white" text="black">
  <center><h1>Welcome to Jquery Multiple Bind Example!</h1></center>

  <p id="add_contact" style="background:#faa; width:300px;">
   <b>Add Contact</b><br/>
   <input id="name"/><br/>
   <button id="add">Add Contact</button><br/>
   <script>
    $('#add').click(function() {
     $('#contact_list, #twitter_widget').trigger('add_contact', $('#name').val() );
     $('#log').trigger('log', 'Contact Added: ' + $('#name').val() );
    })
   </script>
  </p>

  <p id="connect_div" style="background:#faa; width:300px;">
   <b>Connect To Server</b><br/>
   <button id="connect">Connect</button><br/>
   <script>
    $('#connect').click(function() {
     $('#log').trigger('log', 'Connected to the server.' );
    })
   </script>
  </p>

  <p id="contact_list" style="background:#faa; width:300px;">
   <b>Contact List</b><br/>
   <script>
    $('#contact_list').bind('add_contact', function(e, name) {
     $(this).append('* ' + name + '<br>');
    });
   </script>
  </p>

  <p id="twitter_widget" style="background:#faa; width:1000px;">
   <b>Twitter Widget</b><br/>
   <script>
    $('#twitter_widget').bind('add_contact', function(e, name) {
     $(this).append('> Tweeted: I added ' + name + ' to my contact list, I think this is the beginning of a beautiful friendship.<br>');
    });
   </script>
  </p>


  <p id="log" style="background:#faa; width:1000px;">
   <b>Log</b><br/>
   <script>
    $('#log').bind('log', function(e, name) {
     $(this).append(new Date().getTime() + ':' + name + '<br>');
    });
   </script>
  </p>
 </body>
</html>

Saturday, October 16, 2010

Getting started with Ngix and Strophe.js on Ubuntu

In this post I will get you started on Nginx and Strophe.js
If you missed it, check out my post on Getting started with Ejabberd, it's a precondition to get the stuff in this post going.

I am doing this on Ubuntu 10.04, but I am sure you'll get this running on any Linux flavor.
Lets get started!

Installing Nginx
>sudo apt-get install nginx

Change port on Nginx
I am using port 80 for something else so I will change the port to 8080, this port will be used in all subsequent examples. And you should check the root directory, on some systems it's /var/www, but on mine it was /var/www/nginx-default so that's what I'll use in the rest of this example.
>sudo nano /etc/nginx/sites-available/default
server {
listen 8080 default;
server_name localhost;
...
location / {
root /var/www/nginx-default;
index index.html index.htm;
}


Reload Nginx
sudo nginx -s reload
-s is for signal
Note: On some systems, e.g. Kubunut 10.10, nginx does not start by default. In that case you can start it with >sudo nginx

Check that it works
Point your webbrowser to http://localhost:8080/
You now get a message saying Welcome to nginx!
Yay! It works

Download Strophe.js
Download Strophe.js from http://code.stanziq.com/strophe/
Unzip Strophe somewhere
>unzip strophejs-1.0.1.zip -d ~
Create a Symlink from the root web directory to the folder
>sudo ln -s ~/strophejs-1.0.1

Check that you can reach the page
Go to http://localhost:8080/strophejs-1.0.1/examples/echobot.html
You should now see a page with a simple page with a two field form.

Lets try it out!
Enter form
JID: jonas@localhost
Password: jonas
And click "connect"
Strophe is connecting.
Strophe is disconnecting.

It's not working but we don't expect it to. If you investigate with Firebug you will see that the server is trying to connect with BOSH to http://localhost:8080/xmpp-httpbind and since don't have anything there in our Nginx Web Server the connection fail. What we need to do now is add what is called to proxy_pass to /xmpp-httpbind so it directs the traffic to Ejabbers http-bind page, which we set up in the previous post.

Add xmpp-httpbind redirect Nginx
>sudo nano /etc/nginx/sites-available/default
server {
...
location /xmpp-httpbind {
proxy_pass http://localhost:5280/http-bind;
}
...
}

And reload
>sudo nginx -s reload

Start Echobot
Go to http://localhost:8080/strophejs-1.0.1/examples/echobot.html
Enter same details as above and click "connect".
Now you should get...
Strophe is connecting.
Strophe is connected.
ECHOBOT: Send a message to jonas@localhost/15070348051287336618874524 to talk to me.

Great, almost there.
Use an IM, I use Empathy, to connect to localhost with user jonas2@localhost/jonas2 and then send a message to jonas@localhost. Lets send "Test"
Now in the webpage you should see
ECHOBOT: I got a message from jonas2@localhost/c69ef25a: Test
ECHOBOT: I sent jonas2@localhost/c69ef25a: Test

And in Empathy see
sent jonas2@localhost 19:33: Test
received jonas@localhost 19:33: Test


And now you can see that the echobot webpage works. I hope you have enjoyed these two posts on getting started with Ejabberd, Nginx and Strophe.js, if you have any questions or comments feel free to comment on this post.

See you soon!

Friday, October 15, 2010

Getting started with Ejabberd on Ubuntu

This is a post on getting started on Ejabber on Linux. I am using Ubuntu 10.04 but it should be the same on most linux flavors. This is part of a html5-xmpp project I am doing with a friend. More on that later.

Lets get started!

Install Ejabberd
>sudo apt-get install ejabberd

Give user admin rights
To give user admin rights you need to edit the config file.
>sudo nano /etc/ejabberd/ejabberd.cfg
In the file you need to add a user who will be admin. To confuse matters, I will call this user "admin" and put him on the host "localhost" which is default.
%% Admin user
{acl, admin, {user, "admin", "localhost"}}.

Ctrl-X to Exit and Save

Register User
Ejabber comes with a admin command called ejabberctl, with that you can do the most wonderful things. Lets register the user "admin" on "localhost" with the password "secret"
>sudo ejabberdctl register admin localhost secret

See all registered user
To see all the users on a host run "ejabberdctl registered_users"
>sudo ejabberdctl registered_users localhost
ejabberdctl should now return a simple
admin

Register bunch of users
Lets register two users, we will need them in the next post
>sudo ejabberdctl register jonas localhost jonas
>sudo ejabberdctl register jonas2 localhost jonas2
>sudo ejabberdctl register jonas3 localhost jonas3


Unregister User
This is how you unregister users if you need to do that.
>sudo ejabberdctl unregister jonas3 localhost

Restart Server
Lets restart the server
>sudo ejabberdctl restart

Webadmin
There is a webadmin where you can administer and monitor your ejabber server
Go to http://localhost:5280/admin/
Log in with admin/secret to see all the wonderful stats

Get ready for XMPP


Now that we have the server up and running with a bunch of users, we need to check if it's equipped with http-bind so that we can use BOSH for XMPP communication.

Edit config file
Make sure your config file has http-bind enabled
>sudo nano /etc/ejabberd/ejabberd.cfg
It should look like this:
{5280, ejabberd_http, [
http_bind,
http_poll,
web_admin
]}


And add the http_bind module
{modules,
[
...
{mod_http_bind, []},
...
]}

Lets restart the server
sudo ejabberdctl restart

Verify it on the webpage
Go to http://localhost:5280/http-bind
You should now see a text which reads something like
ejabberd mod_http_bind v1.2
An implementation of XMPP over BOSH (XEP-0206)
This web page is only informative. To use HTTP-Bind you need a Jabber/XMPP client that supports it.


Great, now everything seems to be working. Now check out the next post to get Strophe.js and Nginx up and running!

Thursday, October 14, 2010

Setting up QTP with Terminal Emulator

This posts shows the settings for connecting QTP to terminal emulators 3270 and AS400. These settings works for us in my current project and hopefully it'll work for you or at least point you in the right direction.

Settings for attachmate
Vendor: Attachment (WRQ)
Emulator: Extra 7.1
Protocol: 3270


Settings for IBM AS400
Vendor: IBM
Emulator: IBM PCom
Protocol: Auto-Detect