Yesterday coming home from a night of dining and board games I decided to update my Nvidia drivers. The reason I wanted to do this was because I just bought the Humble Frozen Synapse bundle and it was running slow on my machine, I thought that updating the Drivers would give me some sweet Hardware acceleration and kung fu graphics.
But instead of Gaming Heaven I entered Linux Hell.
After selecting "NVIDIA accelerated graphics driver (version current) Recommended" and rebooting I couldn't use my computer any more. Ubuntu and Unity would start. I was able to move the mouse but rest of the desktop was frozen. It was like it had frozen in mid launching.
I figured that changing back to the old driver would fix it. Likely by entering some kind of Graphics Safe Mode. But how to do this without a GUI was a not obvious to me.
This is the long version of how I fixed it. I have included some, but not all, of my trial and error. I am writing this both for my sake, otherwise I am likely to forget how it was fixed, and for your sake, hoping to help someone with similar problems.
Part 1: Grub
Since I only have one OS on my computer Grub was configured to not show a menu on start up. So first I needed to figure out how to enter Grub on boot. Holding down SHIFT like it said in the documentation didn't work so I after I while I figured out that if I pressed "Ctrl+Alt+Del" and held for a few seconds it would reboot and Grub menu would show up. Doing this all the time was annoying so I decided to enable Grub on boot.
Step by Step instructions:
* Reboot and hold "Ctrl+Alt+Del" to enter Grub.
* Select Recovery mode of latest kernel
* Select "Drop To Root Shell Prompt"
(Root shell did not ask for password which was kind of scary)
* Edit file /etc/default/grub
I changed "GRUB_HIDDEN_TIMEOUT=0" to "GRUB_HIDDEN_TIMEOUT="
This, according to Grub Documentation, means
- The menu will be displayed for the number of seconds designated by GRUB_TIMEOUT.
I changed "GRUB_HIDDEN_TIMEOUT_QUIET=true" to "GRUB_HIDDEN_TIMEOUT_QUIET=false"
This, according to Grub Documentation, means
- A counter will display on a blank screen for the duration of the GRUB_HIDDEN_TIMEOUT value.
* Restarting Computer
Now Grub menu is shown by default. Yay!
Part 2: Disable auto-login
Since I'm the only user on the system Ubuntu has been set up to Auto-Login with my User. I needed to turn this off since I figured I could select Safe Mode from login screen. I couldn't enter the system since it freezes so I needed to do this from the command prompt.
Step by Step instructions:
* Reboot to enter Grub.
* Select Recovery mode of latest kernel
* Select "Drop To Root Shell Prompt"
* Edit file /etc/gdm/custom.conf
I changed "AutomaticLoginEnable=false" to "AutomaticLoginEnable=true"
* Restart Computer, select latest Linux in Grub
Now I have a login screen instead of a Unity that hangs. Yay!
Part 3: Login Safe Mode
When login screen appears I stopped the timed login and selected my user.
At the bottom of the screen there is bar where you can choose window manager.
I selected "Ubuntu Classic" which means Gnome, and enter Ubuntu.
Won't Start! Same as in Unity, freezes Desktop but I can move the mouse. Damn!
* Restart and try again
This time I select "Ubuntu Safe Mode" and enter Ubuntu.
It starts and I can use my computer again!
I'm so close to victory that I can taste it.
Part 4: Disable nvidia-current
* From Gnome menu I select "System" -> "Administration" -> "Additional Drivers" and try to enable the old Nvidia drivers but is informed that I do not have permissions to do such a thing.
* Using "System" -> "Preferences" -> "Main Menu" I find out the command to start "Additional Drivers" which is "/usr/bin/jockey-gtk".
* Start terminal and enter "sudo /usr/bin/jockey-gtk"
* Dialogue opens and I can enable the old Nvidia drivers.
* Restart Computer and Select "Ubuntu" on login screen.
Now Unity starts without freezing!
After a few hours of fighting with Linux I am finally back to where I started.
Frozen Synapse still has bad FPS and lagging but I so much better than a Computer that freezes.
Have a great weekend!
Saturday, October 8, 2011

Sunday, August 7, 2011
VVVVV on Ubuntu 11.04
Today I bought The Humble Indie Bundle #3
It's a collection of Indie games and it's pay-what-you-want. They clamied that "All games in the Humble Indie Bundle work natively on Linux." and I am interested to see if they really do. I have heard of most of the games and was very keen on trying out VVVVV which seems really cool.
It's only 2 days left on the package so hurry if you want to try it out.
The sale of the bundle is over :(
http://www.humblebundle.com/
After paying $10 I got a link where I could download the games. After downloading and unzipping VVVVV I entered the terminal and tried to run it.
>sh VVVVV
But got an error
./VVVVVV_32: error while loading shared libraries: libSDL_mixer-1.2.so.0: cannot open shared object file: No such file or directory
A litle googleing told me that the SDL_mixer library is missing.
Let's install it.
>sudo apt-get install libsdl-mixer1.2
And it works!

I'll try the other games and write more about it later.
Now I am going to enjoy the game.
Have fun!
UPDATE:
Mini Review!
VVVVV is a fantastic game, it's loads of fun and extremly challenging. I died almost a thousand times in the 2½ hours it took me to complete the game. But it was worth every death. It's innovative and groundbraking.
VVVVV is like Meteroid on LSD!
Final Stats.

I still have some "trinktes" left to collect. They are optional but adds extra value to the game. I'm sure that collecting the last 6 take me as long time as to finish the regular game.
If you get chance to try VVVVV you should, it's a great game.
http://thelettervsixtim.es/
Have fun!
Progress on Player Levels
Player Levels I have finished so far:
* Line Warp ( fun and challanging )
* Roadtrip to the moon ( fun but short )
* Pyramid Of Doom ( great but to short )
 * Variation Venture ( best so far! )

It's a collection of Indie games and it's pay-what-you-want. They clamied that "All games in the Humble Indie Bundle work natively on Linux." and I am interested to see if they really do. I have heard of most of the games and was very keen on trying out VVVVV which seems really cool.
The sale of the bundle is over :(
http://www.humblebundle.com/
After paying $10 I got a link where I could download the games. After downloading and unzipping VVVVV I entered the terminal and tried to run it.
But got an error
A litle googleing told me that the SDL_mixer library is missing.
Let's install it.
And it works!

I'll try the other games and write more about it later.
Now I am going to enjoy the game.
Have fun!
UPDATE:
Mini Review!
VVVVV is a fantastic game, it's loads of fun and extremly challenging. I died almost a thousand times in the 2½ hours it took me to complete the game. But it was worth every death. It's innovative and groundbraking.
VVVVV is like Meteroid on LSD!
Final Stats.

I still have some "trinktes" left to collect. They are optional but adds extra value to the game. I'm sure that collecting the last 6 take me as long time as to finish the regular game.
If you get chance to try VVVVV you should, it's a great game.
http://thelettervsixtim.es/
Have fun!
Progress on Player Levels
Player Levels I have finished so far:
* Line Warp ( fun and challanging )
* Roadtrip to the moon ( fun but short )
* Pyramid Of Doom ( great but to short )


Friday, July 1, 2011
The true beauty of QTP
Ian Fraser has well said it -
“The true beauty of QTP is that the only limitation is your imagination and ability to code in VBScript.”
“The true beauty of QTP is that the only limitation is your imagination and ability to code in VBScript.”
Saturday, January 8, 2011
Getting Amiga 500 game Demon's Winter running on Ubuntu
This is a step by step instruction on how to get the Amiga 500 game Demon's Winter running on Ubuntu 10.10.
It's highly probable that these instructions will get most Amiga games running on most versions of Ubuntu/Linux. At the very least it'll give you an understanding of the steps to take to get emulating Amiga to work.
Step 0: What is Demon's Winter?
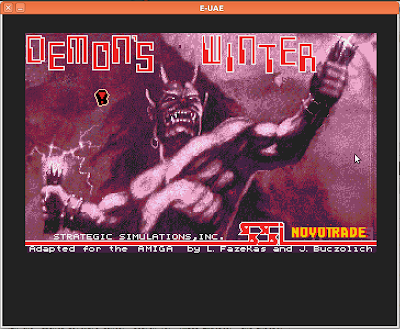
Demon's Winter is a role-playing game released in 1988 for the Amiga by Moby Games. A friend told me about it so I decided to try and get it up and running on my Linux Desktop. If you want to know more check out the following pages
http://en.wikipedia.org/wiki/Demon's_Winter
http://www99.epinions.com/game-review-F1F-5744459-3A290AB3-prod1
Step 1: Download Demon's Winter rom
Amiga roms are called .adf ( Amiga Disk File ) and you need it to play the game naturally.
Download zipped Demon's Winter rom from link belown and unzip it somewhere.
http://www.emuparadise.org/Amiga_ROMs/Demon's_Winter/5958
Step 2: Download Amiga Kickstart Rom 1.3
To start the game you need to emulate the Amiga OS, for this you need a Kickstart Rom. In case of the Amiga 500 you need a 1.3 kickstart rom. You can create your own if you own the original amiga disks but it's probably also legal to download it if you do.
Asuming you do own a copy, download these zipped roms from pirate bay and unzip "Amiga kick13.rom" somewhere.
http://thepiratebay.org/torrent/4021764/Amiga_Kickstart_Rom_1.3__2.0_and_3.1
Step 3: Install Amiga Emulator E-UAE
In the "Ubuntu Software Center" search for "Amiga Emulator" and install "E-UAE".
Step 4: Start Game!
Start E-UAE
Select the "Memory" tab. Change Kickstart ROM file and select "Amiga kick13.rom"
Change to "Floppy disks" tab. For DF0, click "insert" and select "Demon's Winter.adf"
Change to "Game ports" tab. I'm using Mouse for Port 0 and Numeric Pad for Port 1 and that seems to be working fine.
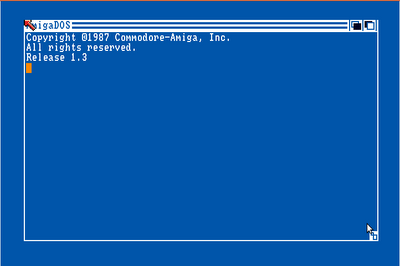
Click start, after a while the Amiga loading screen should should up. Wait for a few seconds and Demon's Winter starts.
Enjoy the game!
Saturday, November 27, 2010
HTML5 Gaming Library Ideas
At Øredev this year and I went to a presentation on Cocos2d for Iphone, "a framework for building 2D games, demos, and other graphical/interactive applications on the Iphone". Since I have been working with HTML5 this gave me an idea that there should be a similar library for HTML5.
This is some of the main features that I think need to be a part of it:
Scene
The Scene object should automaticaly cover the entire canvas/screen.
Holds a list of Nodes
Can hold a list of Layers
An Application can have many Scenes.
- A pause scene
- Main menu scene
- Game scene
It should be possible to have transistions between Scenes
Layers
This is an invisible container for nodes. It can be used to create layered effects such as a background layer and a front layer.
Nodes
Nodes are the objects.
Attributes
-position ( in relation to their parent node, scene or layer )
Should the position be midpoint or left corner. I think both should be possible and can be set depending on what kind of object it is we are working with. E.g. Tile(left corner), Bullet(midpoint)
Methods
-Move To
-Move
-Scale
-Rotate
-RegisterEvent
Sprite
A sprite is a type of node that has an image
Used for images and textures.
Label
A sprite is a type of node that has text
Attributes:
-Text
-Font
-Size
Methods
-Update Text
Prebuilt Nodes Structures
To make it easy for people there should be inbuilt node structures.
E.g.
Menu
-Has menu items
Node Factory
There should be a node factory that creates nodes. Similary to Strophe and Jquery
The factory could be accessed through any other node or scene to create a child node
$scene.cnode(parameters);
$node.cnode(parameters);
Identification
Should use Jquery like identification
I am using the JQuery operator $ in my example but likely it would need to be something else.
$('#apa') - Find object with Id 'apa'
$('node') - All nodes
$('.sprite') - All nodes of class sprite (and it should be possible to create your own classes.
Sequence of Actions
Like JQuery and Strophe objects (nodes,scenes,layers) should return them self if nothing else is returned. This makes it possible to to sequences.
$('#apa').rotate(5).scale(-1).move(150)
$(this).cnode(parameters).move(150).up().scale(160)
Schedule
There should be schedule methods to do time based gaming.
Physics
Could be joined with BOX2DJS for 2d physics
Director
Should be a director that controls the flow of things.
Sound
Background Music
Effects
Particle System
It would be coold to have particle system to create fire and stuff like that.
Tuesday, November 16, 2010
QTP: Connecting to SQL Database
This post describes how you can connect to a SQL Database, execute an SQL statement and loop through the results from QTP using vbscript. The process is pretty straight forward, the main issue is getting the correct connection string for your database.
In the example I am connecting to Access database Northwind. But it should be the same code for connecting to any database, just a different connection string. In my current project we are using this to connect to a IBM DB2 database and it works great.
Option Explicit
Dim connectionString, sql, cn, cmd, rs
' Connection String required to connect to MS Access database
connectionString = "Provider=Microsoft.Jet.OLEDB.4.0;Data Source=C:\Program Files\Microsoft Office\Office10\Samples\Northwind.mdb;"
' SQL statement to run
sql = "select EmployeeID,LastName from employees"
' Create ADO Connection/Command objects
set cn = createobject("ADODB.Connection")
set cmd = createobject("ADODB.Command")
' Open connection
cn.open connectionString
' Associate connection object with command object
cmd.ActiveConnection = cn
' Set the SQL statement of the command object
cmd.CommandText = sql
' Execute query
set rs = cmd.execute
' Enumerate each row in the result set
while rs.EOF <> true and rs.BOF <> True
' Using ordinal
msgbox "Employee ID: " & rs(0)
' Using name
msgbox "Last Name:" & rs("LastName")
rs.movenext
wend
' Close Connection
cn.Close
Dim connectionString, sql, cn, cmd, rs
' Connection String required to connect to MS Access database
connectionString = "Provider=Microsoft.Jet.OLEDB.4.0;Data Source=C:\Program Files\Microsoft Office\Office10\Samples\Northwind.mdb;"
' SQL statement to run
sql = "select EmployeeID,LastName from employees"
' Create ADO Connection/Command objects
set cn = createobject("ADODB.Connection")
set cmd = createobject("ADODB.Command")
' Open connection
cn.open connectionString
' Associate connection object with command object
cmd.ActiveConnection = cn
' Set the SQL statement of the command object
cmd.CommandText = sql
' Execute query
set rs = cmd.execute
' Enumerate each row in the result set
while rs.EOF <> true and rs.BOF <> True
' Using ordinal
msgbox "Employee ID: " & rs(0)
' Using name
msgbox "Last Name:" & rs("LastName")
rs.movenext
wend
' Close Connection
cn.Close
Tuesday, October 19, 2010
Multiple Binds/Triggers in JQuery
Today I experimented with Multiple binds/triggers in Jquery. What I wanted to do what to raise an event, lets say "Add Contact" and have multiple other elements react on that. Well, it wasn't as smooth as I expected since you have to trigger an event on a specified element and only that element or a parent element can bind to it.
Example:
Take this very simple webpage. The scenario is that I wan't to trigger an event when clicking on "Add Contact" and on that event something should happen with both my contact list and my twitter widget.
...
<body>
<div id="main">
<button id="add_contact">Add Contact </button>
<div id="contact_list">Contact List: </div>
<div id="twitter_widget">Twitter Widget: </div>
</div>
</body>
...
<body>
<div id="main">
<button id="add_contact">Add Contact </button>
<div id="contact_list">Contact List: </div>
<div id="twitter_widget">Twitter Widget: </div>
</div>
</body>
...
So if I want to trigger an event on the button you have to trigger it on some element. If I trigger it on contact_list then only that element can bind to it, and if I trigger it twitter_widget then contact_list can't bind to it. So the solution is to bind it to both elements.
We'll have to image that I have a variable with the contact object
$('#add_contact').click(function() {
$('#contact_list, #twitter_widget').trigger('add_contact', contact );
})
$('#contact_list, #twitter_widget').trigger('add_contact', contact );
})
And then add binds to both your elements.
$('#contact_list').bind('add_contact', function(e, contact) {
$(this).append('* ' + contact.name + '
');
});
$('#twitter_widget').bind('add_contact', function(e, contact) {
$(this).append('> Tweeted: I added ' + contact.name + ' to my contact list, I think this is the beginning of a beautiful friendship.
');
});
$(this).append('* ' + contact.name + '
');
});
$('#twitter_widget').bind('add_contact', function(e, contact) {
$(this).append('> Tweeted: I added ' + contact.name + ' to my contact list, I think this is the beginning of a beautiful friendship.
');
});
I want to finish this post with a lengthy example where I use this technique and also the reverse. Where I have two buttons that trigger the same event on another element. Great for logging. And also an example where one button click triggers more than one event. It know it looks messy in a this post so just copy-paste it to your favorite editor, save as .html and open in a browser and you will see the magic.
Enjoy!
<html>
<head>
<title>Welcome to Jquery Multiple Bind Example!</title>
<script src="http://ajax.googleapis.com/ajax/libs/jquery/1.4.3/jquery.js"></script>
</head>
<body bgcolor="white" text="black">
<center><h1>Welcome to Jquery Multiple Bind Example!</h1></center>
<p id="add_contact" style="background:#faa; width:300px;">
<b>Add Contact</b><br/>
<input id="name"/><br/>
<button id="add">Add Contact</button><br/>
<script>
$('#add').click(function() {
$('#contact_list, #twitter_widget').trigger('add_contact', $('#name').val() );
$('#log').trigger('log', 'Contact Added: ' + $('#name').val() );
})
</script>
</p>
<p id="connect_div" style="background:#faa; width:300px;">
<b>Connect To Server</b><br/>
<button id="connect">Connect</button><br/>
<script>
$('#connect').click(function() {
$('#log').trigger('log', 'Connected to the server.' );
})
</script>
</p>
<p id="contact_list" style="background:#faa; width:300px;">
<b>Contact List</b><br/>
<script>
$('#contact_list').bind('add_contact', function(e, name) {
$(this).append('* ' + name + '<br>');
});
</script>
</p>
<p id="twitter_widget" style="background:#faa; width:1000px;">
<b>Twitter Widget</b><br/>
<script>
$('#twitter_widget').bind('add_contact', function(e, name) {
$(this).append('> Tweeted: I added ' + name + ' to my contact list, I think this is the beginning of a beautiful friendship.<br>');
});
</script>
</p>
<p id="log" style="background:#faa; width:1000px;">
<b>Log</b><br/>
<script>
$('#log').bind('log', function(e, name) {
$(this).append(new Date().getTime() + ':' + name + '<br>');
});
</script>
</p>
</body>
</html>
<head>
<title>Welcome to Jquery Multiple Bind Example!</title>
<script src="http://ajax.googleapis.com/ajax/libs/jquery/1.4.3/jquery.js"></script>
</head>
<body bgcolor="white" text="black">
<center><h1>Welcome to Jquery Multiple Bind Example!</h1></center>
<p id="add_contact" style="background:#faa; width:300px;">
<b>Add Contact</b><br/>
<input id="name"/><br/>
<button id="add">Add Contact</button><br/>
<script>
$('#add').click(function() {
$('#contact_list, #twitter_widget').trigger('add_contact', $('#name').val() );
$('#log').trigger('log', 'Contact Added: ' + $('#name').val() );
})
</script>
</p>
<p id="connect_div" style="background:#faa; width:300px;">
<b>Connect To Server</b><br/>
<button id="connect">Connect</button><br/>
<script>
$('#connect').click(function() {
$('#log').trigger('log', 'Connected to the server.' );
})
</script>
</p>
<p id="contact_list" style="background:#faa; width:300px;">
<b>Contact List</b><br/>
<script>
$('#contact_list').bind('add_contact', function(e, name) {
$(this).append('* ' + name + '<br>');
});
</script>
</p>
<p id="twitter_widget" style="background:#faa; width:1000px;">
<b>Twitter Widget</b><br/>
<script>
$('#twitter_widget').bind('add_contact', function(e, name) {
$(this).append('> Tweeted: I added ' + name + ' to my contact list, I think this is the beginning of a beautiful friendship.<br>');
});
</script>
</p>
<p id="log" style="background:#faa; width:1000px;">
<b>Log</b><br/>
<script>
$('#log').bind('log', function(e, name) {
$(this).append(new Date().getTime() + ':' + name + '<br>');
});
</script>
</p>
</body>
</html>
Subscribe to:
Posts (Atom)